

Scooter decal kit: how to customize your Booster, Nitro, or Aerox?
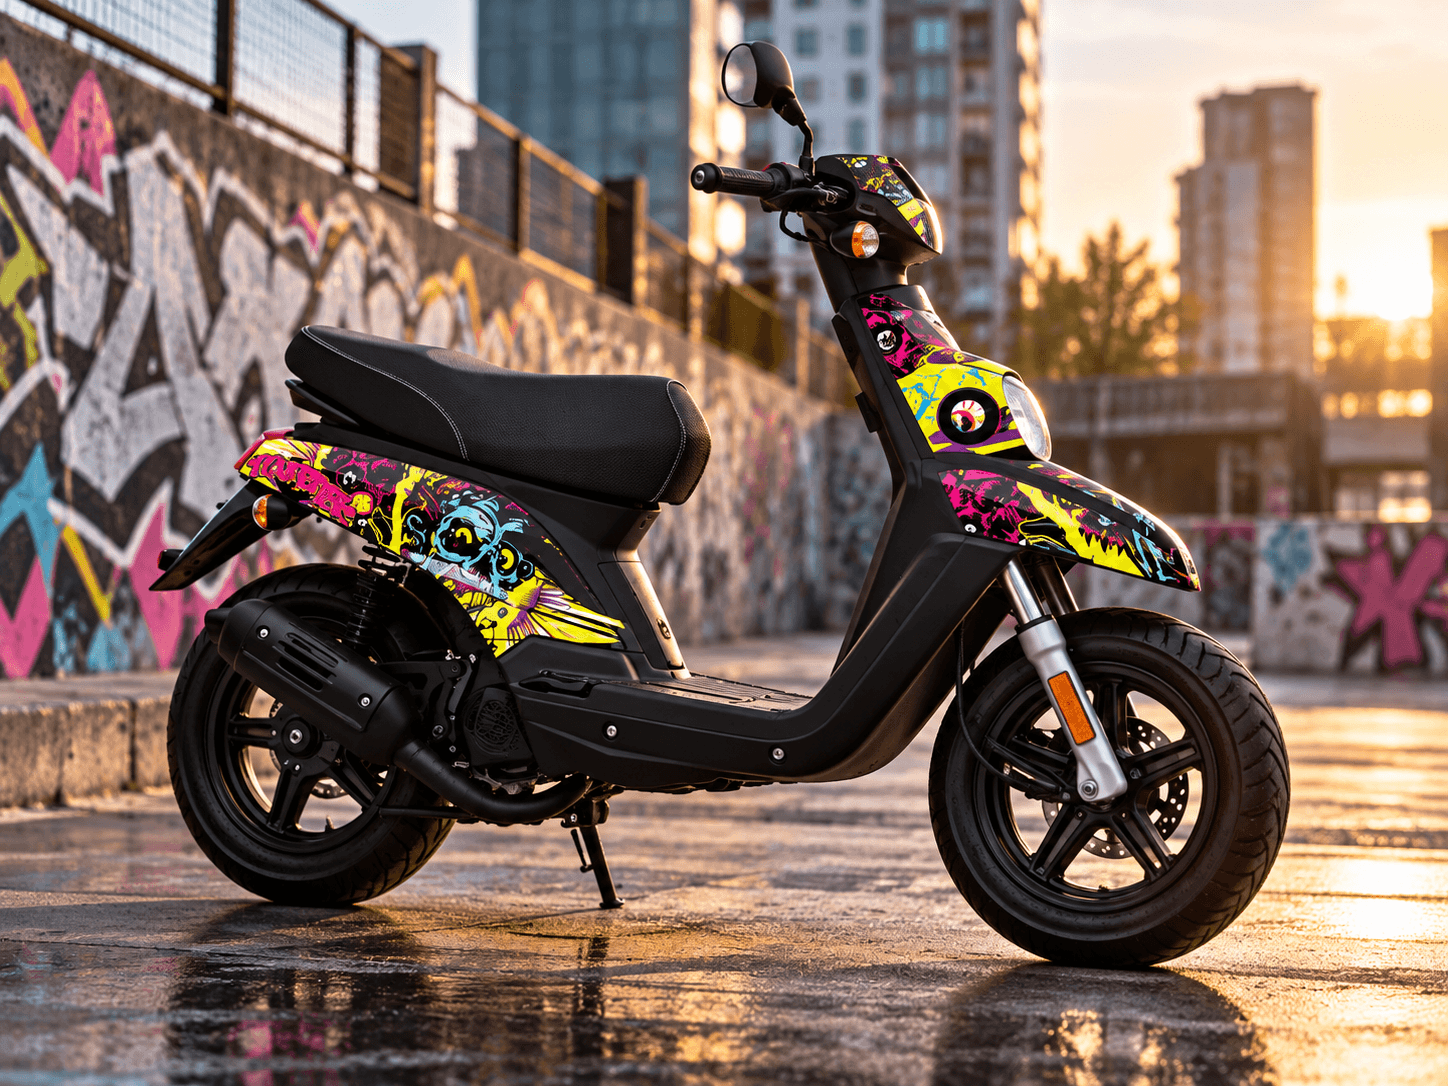
How to choose a scooter decal kit? Booster, Nitro, Aerox: discover KUTVEK's tips to customize, apply and maintain your decals.
Scooter Decal Kit: How to Customize Your Booster, Nitro or Aerox?
Scooters have long been a prime canvas for customization.
An MBK Booster, MBK Nitro or Yamaha Aerox can completely transform its appearance with the right decals: racing look, aggressive colours, sleek style, premium finish or more original designs.
Unlike paint, decal kits allow you to visually modify your scooter while keeping the option to change its style later.
But how to choose the right kit? What's the difference between models? And most importantly, how to achieve a clean, long-lasting result?
Here are the key points to know before customizing your scooter.
Why Install a Decal Kit on a Scooter?
The first reason is obviously aesthetic.
A scooter's fairings represent a major part of its appearance. Changing their decals can radically alter the vehicle's identity without replacing all parts.
A decal kit can give your scooter a:
- racing style;
- street look;
- sleek appearance;
- colourful design;
- or completely different look from stock.
The vinyl also adds a protective layer to covered surfaces, helping shield fairings from minor scratches and daily wear.
However, be precise: a decal kit is not mechanical protection and obviously can't prevent damage from falls or major impacts.
MBK Booster: A Customization Classic
The MBK Booster is one of the scooters most associated with customization.
Its fairings and compact silhouette allow for dramatically different results depending on the chosen graphics.
KUTVEK offers several kits specifically for the Booster, with different ranges and finish options. Kutvek
A relatively standard Booster can take on a much sportier identity just by working with:
- main colours;
- contrasts;
- patterns;
- and kit finish.
→ Commercial links: KUTVEK Scooter category
MBK Nitro: Making the Most of Large Fairings
The MBK Nitro has a different architecture.
Its body surfaces offer more space for graphics, allowing for highly visible designs.
Designs can be built around multiple zones to maintain visual continuity between different scooter elements.
KUTVEK also offers kits specifically adapted for the Nitro. Kutvek
This is important: a kit shouldn't be chosen just for its appearance.
It must precisely match the scooter model and year.
Yamaha Aerox: An Ideal Base for Sporty Style
The Yamaha Aerox also lends itself particularly well to dynamic decals.
Its naturally sporty lines allow for more aggressive graphics or, conversely, much cleaner designs.
Specific Yamaha Aerox kits are available from KUTVEK, with model and year selection before ordering. Kutvek
This verification is essential: two generations of the same scooter may have fairing differences that make a kit incompatible.
How to Choose the Right Scooter Decal Kit?
Before focusing on graphics alone, start by precisely identifying your vehicle.
Check:
- the brand;
- exact model;
- year;
- generation when multiple versions exist.
Only then comes aesthetic choice.
A good design should work with elements that remain visible: wheel colour, seat, frame, mechanical parts or accessories.
A spectacular kit shown alone isn't necessarily the one that will give the most coherent result once installed.
Which Finish to Choose?
Finish greatly affects the final result.
The same design can give very different impressions depending on surface treatment.
A gloss finish strongly highlights colours and gives graphics depth.
Matte generally provides a more discreet, modern look.
Holographic effects create reflections that change with light.
Glitter effects add more depth to graphics.
And fluorescent colours prioritize visual impact above all.
To compare these finishes more precisely:
→ Internal link: "Motorcycle Decal Kit: Matte, Gloss, Glitter, Holographic or Fluorescent?"
How to Prepare Fairings Before Installation?
This is probably the most important step.
An excellent kit installed on poorly prepared surfaces will give poor results.
Fairings must be:
- perfectly clean;
- dry;
- free of grease;
- cleared of old decal adhesive residue;
- and without products leaving a greasy or silicone layer.
KUTVEK also recommends working at an appropriate temperature so the vinyl can properly conform to shapes. For their scooter products, the vinyl is designed to become more malleable with heat, and the adhesive allows repositioning during the first minutes of installation. Kutvek
Can You Install a Scooter Decal Kit Yourself?
Yes, if you take your time.
Before completely removing the backing, position each element on the fairing to identify its placement.
Then proceed gradually rather than trying to apply the entire piece at once.
Heat helps the vinyl follow certain shapes and contours.
Pay special attention to edges, corners and highly curved areas.
Even though our guide illustrates a motocross kit, the vinyl preparation and installation principles remain useful:
→ Internal link: "How to Install a Motocross Decal Kit? KUTVEK Installation Guide"
How to Maintain a Scooter Decal Kit?
Simple maintenance is usually sufficient.
Regularly wash your scooter to prevent dirt buildup.
With a pressure washer, avoid placing the nozzle too close to decal edges and directing strong pressure directly under the vinyl.
Also avoid solvents and particularly aggressive products.
→ Internal link: "How to Wash and Maintain a Motorcycle Decal Kit?"
When Should You Replace Your Decal Kit?
There's no universal lifespan for all scooters.
UV exposure, outdoor parking, washing frequency, scooter use and installation quality directly affect kit aging.
A scooter parked daily outside won't face the same conditions as one stored in a garage.
We've dedicated a complete guide to this topic:
→ Internal link: "How Long Does a Motorcycle Decal Kit Last?"
Booster, Nitro or Aerox: Create a Scooter That Reflects You
Customization isn't just about adding a few stickers.
A properly chosen kit lets you work on the scooter's overall style and create real coherence between its fairings, colours and accessories.
Whether you ride an MBK Booster, MBK Nitro, Yamaha Aerox or another compatible scooter, the goal remains the same: get a vehicle that doesn't look like all the others.
KUTVEK offers a scooter line with precut kits matching different models and years. Kutvek
Ready to Change Your Scooter's Look?
Discover KUTVEK scooter decal kits, select your brand, model and year, then choose the design that matches your style.
Discover KUTVEK Scooter Decal Kits
FAQ — Scooter Decal Kits
Are There Decal Kits for MBK Booster?
Yes. KUTVEK offers several designs dedicated to the MBK Booster, with model and year selection before ordering. Kutvek
Can You Put a Decal Kit on an MBK Nitro?
Yes. Specific kits are available for the MBK Nitro. Verify compatibility with model and year before ordering. Kutvek
Are There Kits for Yamaha Aerox?
Yes. KUTVEK also offers graphic kits adapted for the Yamaha Aerox. Kutvek
Should You Remove the Old Kit Before Installing a New One?
Yes. To get a suitable surface, it's best to remove old decals then thoroughly clean and degrease fairings before new installation.
Can You Heat the Kit During Installation?
Yes. Heat helps the vinyl become more flexible and follow fairing contours. KUTVEK scooter product sheets also specify that the adhesive allows repositioning during the first minutes. Kutvek
Does a Decal Kit Protect Fairings?
The vinyl adds a layer to covered areas and can help limit minor surface scratches. However, it doesn't replace real impact protection.
Can You Wash a Scooter with a Decal Kit Using a Pressure Washer?
Yes, while maintaining reasonable distance and especially avoiding directing strong pressure directly against vinyl edges.